ECE 460
Final Project
Jonathan Connell's
Muramator Robot
Implemented with
Digital Micro controllers
by Sean Korb
December 8, 1995
Abstract:
Jonathan Connell's Muramator robot, featured in the August 1991 issue of Popular Electronics, is implemented using micro controller neurons instead of analog neurons. Muramator, a "wall hugging creature", features a neural network to implement sensation, reaction, and basic drive behavior. Precise adjustment of neuron "weights" is possible using this method.
1.0 Introduction
For living organisms, neurons implement the software of life. How we feel, move, react, even think is controlled by the neurons in our body. Even the simplest of creatures can react to light, sound, proximity, and chemicals in a specific and pre-programmed regimen. Snails will move up out of the water by moving towards light, and then into a crevice when they are in the air. No prior knowledge was needed, nor was any given. The snail moves in this manner because it is born with the wiring that made it thus. In creating Muramator, Jonathan Connell of the MIT robotics lab desired a minimalist creature that would move towards, find, and then run alongside the walls in a room. He used a small vehicle from Radio Shack that could move forward and turn in reverse. Using capacitors, resistors and a comparator, he implemented 11 neurons to operate as the brain for the creature (see figure 1.1)
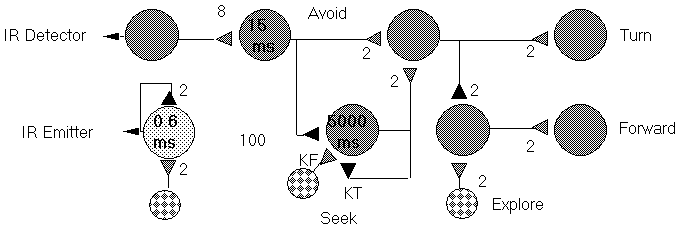 Figure 1.1
In the diagram, dark synapses represent draining neurons and lighter synapses are additive synapses. Checkered neurons are always on, while the other neurons have a constant leakage current of -1. The threshold on all neurons is a Shmitt-trigger: that is, the neuron fires when the integrated input is a 1, and does not turn off again until the integrated input is zero again. The diagram in appendix B describes this operation.
This creature was very effective and inexpensive to build, but once built, it was not very flexible in it's programming, nor could the weights for the neurons be specifically assigned. Adjustment of the weights KT and KF were made by adjusting potentiometers.
2.0 System Design and
Implementation
This muramator implemented Jonathan Connor's neural network for Muramator using two BASIC Stamp modules available from Parallax Inc. The sensory and animatory hardware are similar to the specifications for Connor's Muramator.
2.1 Muramator's
Neural Network
2.1.1 BASIC Stamp
Module
The BASIC Stamp 1 and BASIC Stamp 2 are available from Parallax Inc. They use a PIC microprocessor, voltage regulator, BASIC interpreter, and an EPROM soldered onto a stamp sized PC board. The Stamp1 has 8 I/O pins and runs at 4Mhz. The Stamp2 has 16 I/O pins and runs at 20Mhz. Both modules accept serial inputs and regulate power from a 9V battery to 5.0V on the Stamp. The Stamp2 provides more instruction and data memory as well as an enhanced instruction set. Neither stamp directly handles floating point or negative numbers, though numbers may be programmed in hex, binary, octal, or decimal.
Programs for the modules are composed using Parallax's editing/downloading software available for the IBM PC by FTP for free from their site. After loading a program into the editor, the program was translated into tokens that were fed to the EEPROM on the Stamp using serial lines. The program ran immediately, and could be terminated by removing power to the Stamp. Once the program was loaded, it would run any time power was applied to the Stamp. Though 2 Stamp modules were used, it is certainly possible to use only one Stamp, though the code may have been too crowded and execution too slow if implemented on the Stamp1. The Stamp2 would likely have worked flawlessly if used solo, but it was interesting to find out how two stamps would communicate, especially if discrete behaviors were implemented upon individual Stamps.
2.1.2 Neural Network
Design
Jonathan Connell's neuron map was followed closely, but some things are easier to implement digitally than in analog, as there are also some things more easily implemented using analog technology rather than digital. Where obvious, digital technology replaced neurons that performed the same function. The modified maps are in appendix C.
The Stamp1 was to control the proximity detection neurons. Where Connell used a feedback neuron to generate a pulse, I simply toggled the output pin to the Infrared emitter at the beginning of the program loop. The detector neuron software "integrated" the input from the detector transistor. The weights on the neuron effected the slope of the output to the threshold such that the neuron would more or less quickly reach it's threshold value. There was always a leakage current on this neuron, so the sum equation looked like 8(detector) - 1. Since the equation is integrated over time, the output to the threshold is this sum times the time from t nought divided by the time constant, 100ms in this case. Since the command "pause 1" halts execution for 1ms, this seemed a good approximation for timing. The time constant can be increased, or the weight decreased to artificially increase the amount of time that the neuron will fire, and in this case, increase the time the creature spends engaged in a turn. The integration of the signal allows for rejection of noise pulses and "fly wheeling" through signal dropouts. This function is obviously more effectively implemented using analog logic, but it was interesting to implement it digitally.
It was not necessary to scale the numbers for greater precision since the only results I was interested in were 1 or zero after dividing the result by the time constant. Since the division function for the BASIC Stamp only returns an integer dividend, I could simply wait for the appropriate integer.
Negative numbers were handled by offsetting calculations by 32768 where appropriate. Functions that normally decayed to zero due to a negative slope were put in a positive paradigm where they would increase to 1 to simulate the desired calculation. That said, the coding was rather straightforward, and a complete listing is in appendix A.
When the network on Stamp1 detects an object in Muramator's path, it sends a signal to the Stamp2. This neuron firing suppresses all other behaviors in favor of the "avoid" behavior. The creature turns away from an object in it's path. The "seek" behavior engages about every 3 or 4 seconds if the creature has not found an object, and instructs the machine in a 270_ turn. If an object is encountered in that turn, the seek behavior is suppressed by the avoid behavior, synchronizing the creature, and directing it toward the wall such that it may run beside it. The explore behavior is always on, directing the creature forward on it's quest for meaning and tranquillity in it's. . .hmmmnnn. . .
The explore behavior is suppressed as well when the avoid behavior is implemented.
Several intermediate neurons are used to help direct behavior at a lower level so the programmer is free to program at a higher level. One of the neurons actually implements a simple OR function, so an OR statement was used in the code instead of neuron math. A NOT-AND gate was also present in the network, but this was implemented using Neurons. Some of the software was minimized to save variable space. Code for the Stamp2 implementation is also in Appendix A.
2.2 Muramator Vehicle
Hardware
This presented some of the most difficult problems for building Muramator. Since Radio Shack no longer caries simple and inexpensive toys like the ones I needed for Muramator, I scoured the toy stores trying to look for an appropriate vehicle. I tried one from Radio Shack, but it's turning radius was much too wide, and could not possibly implement Muramator behavior. I finally settled on a small toy that used independently rotating rear wheels to steer itself. Unfortunately, I did not know at the time that the way it managed to do that without moving the front wheels is that it made a "wheelie" in every turn. Since Muramator bristles with batteries for it's payload, and the IR detector needs a stable platform anyway, modifications had to be made. A Lego front wheel for an airplane set was inserted in the front so that it might move laterally with more ease. This proved more of a difficulty than originally thought as the creature would nearly always list to the left, probably due to balance conditions.
2.2.1 Vehicle Motor
Control
Since each wheel in the rear had it's own motor, a system had to be developed to activate either both wheels forward, or one wheel backward to make a turn. I decided upon using three relays controlled by the Stamp2 to add future flexibility if needed. The relays are triggered by a transistor whose minimal base current is given by the Stamp2. The relay provides a resistive load to the collector tied to the 9V power supply, and the emitter has a resistor tied to ground to divide the voltage across the 5V relay. Simple 2n3906 transistors were used for economic reasons. No sense in overkill. A circuit diagram can be found in Appendix D.
2.2.2 Infrared
Emitter
A super bright IR emitting LED was selected hooked in series to a current limiting resistor at the emitter of another 2n3906 transistor. Again, minimal base current is drawn from the Stamp1 module to activate the emitter.
2.2.3 Infrared
Detector
This was the most problematic of the external devices for the creature. The output of the IR detecting transistor is most decidedly analog, so a natural desire would be to have the output to the Stamp1 high if there is small Vce and register low if there is large Vce since the IR light provides the base current. This was accomplished using an LM324 operational amplifier in an inverting comparator configuration. A test voltage is applied to the positive input to the comparator, and if the voltage at the negative input goes higher than the test voltage, the output goes low (to Vsat, about 1.3 volts) and when the negative input goes lower than the test voltage, the output goes to the power supply rail, which in this case is 5V. A 741 was used at first, but it proved too sensitive to input resistance balance, and it seemed to be unhappy having one of it's supply rails sitting at ground state all the time. The LM324 is designed differently and it's internal negative supply rail is referenced to ground, so it is happy at 0V - 5V. A voltage divider with a potentiometer was used for field adjustment of sensitivity of the test voltage.
2.3 Putting it all
together
The hardware previously described was assembled using wire wrap and mounted on the vehicle with wire ties and elastic bands. Batteries were located in the rear for better traction and maneuverability. The IR detector/emitter pair was located at the front of the vehicle, pointed approximately 30_ to the right of center. This makes sense, since the creature avoids obstacles by turning left. The following diagram shows the hardware configurations.
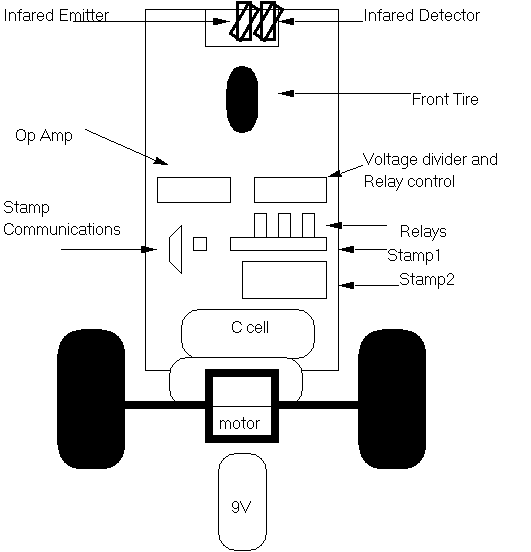
Figure 2.1
2.3.1 Testing
The most frustrating bit of testing was the range of the IR detector. It seemed myopic throughout all the experiments. The creature would roll so quickly that it would hit the wall, and then detect it. It seemed like it needed glasses. The LM324 seemed to help in this regard, though the vehicle still seemed to move too quickly. Pulsing the output to the motor to slow it down was tried, but it seemed to give a high inductive load to the rest of the circuits, and unpredictable behavior was the result.
Experiments with the detected neuron weights went as expected, and an arbitrary degree of turn could easily be implemented by adjusting the time constant, the weights, or both.
Adjusting KF and KT turned out to be more difficult on this model than could be presumed on the analog model with potentiometers. Every adjustment led to a hook up to the PC for a new program download. If dials were installed on Muramator to simulate the action of potentiometers, it might become more ergonomic. However, using raw numbers for weights made predictions about behavior very accurate.
Muramator did indeed implement all of it's behaviors successfully, but it's myopic eyesight and listing celeritous gait made it difficult to show this to the uninformed. Since I knew exactly what I had programmed the creature to do, it was easier for me to detect when the creature was doing it.
3.0 Design Options
This robot is wide open to design options. Different vehicles could be used with the same network as used presently, possibly with better results. The entire network could be redesigned with no hardware alterations to implement entirely different behavior. A back propagating neural net could be programmed onto the Stamp2 such that the creature might "learn" it's own behavior.
Various solutions to the creatures myopic eyesight include using high frequency IR, or using Sonar for proximity detection.
These same design principals can lead to much more complex robots implementing interesting behaviors from washing street corners to sorting recycled waste. The possibilities are endless.
4.0 Conclusions and
Recommendations
There are many remarks that do not fit in a specific category, not the least of which are the Stamp modules from Parallax. It seems that these micro controllers could be used by sophomores or even high school students to implement sophisticated projects. The power supply problems are almost zero, and programming the modules is almost ridiculously easy. It does give students insight into some of the limitations of micro controllers, as well as some of their greater values. Since Parallax offers a 15% discount off of bulk rates for educational use, and the documentation and software is available via FTP, it seems criminal for greater institutions to not teach a course based around the Stamp.
Muramator is much too expensive to produce as a programmable toy. Even with the entire prototype vehicle weighing in at about $70 for a pared down version of what was presented here, there are much less expensive toys that can do the same thing with simple switches and whiskers. It's probably easier to just get yourself a free kitten. It may not be a Muramator, but it's much softer.
'Program For Stamp
1 IR detector and Emitter control
output 5 'Set up output pins
input 6
output 7
symbol time = w1
symbol timeConstant
= w2
symbol sumdetect =
w3
symbol integrand =
w4
time = 0
timeConstant = 20
pin7 = 0
pin5 = 1
start:
if pin5 = 0 then
pinhigh
pin5 = 0
goto lookattime
pinhigh:
pin5 = 1
lookattime:
if time <
timeConstant then addTime
goto notime
addtime
time = time + 1
notime:
sumdetect = 8*pin6 +
32768 - 1
if sumdetect <
32768 then negdetect
posdetect:
sumdetect =
sumdetect - 32768
integrand = 0 +
sumdetect * time / timeConstant
if integrand >= 1
then activate
goto start
negdetect: ' actualy simulates decay of
function
' towards zero
sumdetect = 32768 -
sumdetect
integrand =
sumdetect * time / timeconstant '1-sum*t/T
if integrand >= 1
then deactivate
goto start
activate:
time = 0
pin7 = 1
goto start
deactivate:
time = 0
pin7 = 0
goto start
'Program for Stamp
2 Neuron net and Motor control
input 0
time var word
timeConstant con
5000 '5 seconds
sumseek var word
integrand var word
syn1turnsup var bit
syn1turn var bit
detect var bit
KF con 20 'seek
interval weight, smaller for larger interval
KT con 80 'turn weight, smaller for larger turn time
syn1forwardsup var
bit
syn2forwardsup var
bit
synforward var bit
seek var bit
time = 0
seek = 0
detect = 0
high 7
low 8
low 9
start:
'pause 1
'debug dec? seek
'debug dec? time
'debug dec? sumseek
'debug dec? integrand
avoid:
if in0 = 1 then
setavoidsynapse
syn1turnsup = 0
detect = 0
goto skipsetavoid
setavoidsynapse:
syn1turnsup = 1
detect = 1
skipsetavoid:
seekbehaviour:
if time <
timeConstant then addTime
goto notime
addtime:
time = time + 1
notime:
sumseek = KT *
seek 'KF - KT(seek) - 100(detect) - 1 +
32768
sumseek = 1000 *
detect + sumseek
sumseek = 32768 + KF
- 1 - sumseek
if sumseek <
32768 then negseek
posseek:
sumseek = sumseek -
32768
integrand = 0 +
sumseek * time / timeConstant
if integrand >= 1
then activateseek
goto turnsuppressor
negseek:
sumseek = 32768 -
sumseek
integrand = sumseek
* time / timeConstant '1-sum*t/T
if integrand >= 1
then deactivateseek
goto
turnsuppressor activateseek:
time = 0
seek = 1
goto turnsuppressor
deactivateseek:
time = 0
seek = 0
goto turnsuppressor
turnsuppressor:
if syn1turnsup = 1
or seek = 1 then turnset
syn1turn = 0
syn1forwardsup = 0
goto skipturnset
turnset:
syn1turn = 1
syn1forwardsup = 1
skipturnset:
'explore
forwardsuppressor:
if 1 -
syn1forwardsup = 1 then forwardset '2*syn2 - 2*syn1 =2 or 0
synforward = 0
goto forsupskip
forwardset:
synforward = 1
forsupskip:
'behave
'debug dec?
synforward
'debug dec? syn1turn
'debug"."
'debug"."
'debug"."
out7 = synforward
out8 = syn1turn
out9 = syn1turn
pause 1'000
goto start